
Salesforce Overview
Vitally's Salesforce integration can sync the following data between Salesforce and Vitally. We only support Objects that are directly associated to the Account/Organization object in Salesforce:
Accounts - Bi-directionally sync and/or import Salesforce Accounts (or the Salesforce object you use as the equivalent) into Vitally as Vitally Accounts. You can whitelist the Salesforce fields to add to your Vitally account profiles, make changes to those fields in Vitally, and push Vitally's customer analytics (e.g., health scores, indicators) back to your Salesforce records.
Contacts - Bi-directionally sync and/or import Salesforce contacts into Vitally as Vitally Users.
Opportunities and Custom Objects - Bi-directionally sync any custom object from Salesforce into Vitally and even create new objects directly in Vitally. Opportunities are treated as Custom Objects and are supported on the same full read/write/create basis.
Notes - Sync your Salesforce notes into Vitally and push Vitally's notes back to Salesforce.
Tasks - Sync your Salesforce tasks into Vitally and push Vitally's tasks back to Salesforce.
ℹ️ When the Salesforce integration is enabled, we will sync all of an account's objects (i.e., notes, tasks, custom objects) created or updated in the last 12 months.
Salesforce Supported Field Types
Vitally Field | SFDC Field |
String | Text |
Number | Number |
Date | Date |
Boolean | Checkbox |
Multi-select | Picklist (multi-select) |
Textarea | Text Area and Long Text Area |
File attachment | N/A |
For further information, you can review the Salesforce developer documentation here.
Field Types Salesforce FAQ
Configuring field types to sync in data
Configuring field types to sync in data
Why is my formula (text) field displaying in HTML and not a URL?
The Salesforce formula uses a Hyperlink HTML function within the formula field. If you remove the Hyperlink function in Salesforce, the value pulls into Vitally as a normal text string.
Enabling the Salesforce Integration
ℹ️ Before you enable the Salesforce integration, ensure that:
Your Salesforce account has the REST API add-on
The Salesforce user you connect with has the following enabled within their Permission Sets:
Read, Create, and Edit Object Permissions enabled for the Salesforce objects you wish to connect
Read, Create, and Edit Object Permissions enabled for the Push Topic object, which Vitally uses to subscribe to Salesforce changes in real-time
View Setup and Configuration System Permission enabled
You haven't exhausted your API credits for the day
Salesforce now restricts some Connected Apps so you may need to manually approve the installation of the Vitally Connected App in Salesforce. See the Salesforce article on the approval process here. Additionally, you can whitelist the Vitally IPs below, or simply relax the IP restrictions, to ensure the Vitally Connected App can access your Salesforce data securely.
ℹ️ For US-hosted Vitally customers:
52.2.105.119, 34.198.95.164, 54.225.45.200, 3.233.54.92, 44.197.82.135, 44.205.137.47, 3.231.135.245, 34.234.2.125, 18.117.45.34, 18.118.174.158, 3.128.104.4, 3.128.39.40, 3.137.39.224, 3.20.73.62
ℹ️ For EU-hosted Vitally customers:
13.50.117.250, 13.48.176.93, 13.48.142.17, 13.53.227.107, 16.171.90.148, 16.170.120.57, 16.171.215.121, 16.171.156.82
How-To | How-To Visual |
|  |
ℹ️ Contact our support team if you are looking to connect a Salesforce sandbox to Vitally
Creating Organizations from Salesforce
How-To | How-To Visual |
| Step 1-5:  Step 6-11:  |
Creating Accounts from Salesforce
How-To | How-To Visual |
| Step 1-5:  Step 6-11:  |
Creating Users from Salesforce
ℹ️ If you create Organizations and/or Accounts via Salesforce and also create Users via Salesforce, Vitally will inherently only create Users related to the synced Organizations and Accounts. If needed, you can add additional filters to the configuration to further limit which Users are synced.
How-To | How-To Visual |
| Step 1-4:  Step 5-11:  |
Syncing Notes & Tasks from Salesforce
Vitally's Salesforce integration can be used to achieve a bi-directional sync of Notes and Tasks between the two systems.
If your Organizations and/or Accounts are synced with Salesforce and you also import Notes and Tasks from Salesforce, Vitally will only sync Notes and Tasks associated with those synced Organizations and Accounts.
To sync Salesforce Enhanced (Lightning) Notes with Vitally, the Salesforce connected integration user must have the appropriate API permissions. Ensure the following permission is enabled for that user:
Setup → Permission Sets → (select the connected integration user Permission Set) → App Permissions → ContentEnable the permission
Query All Files: Allows View All Data users to SOQL query all files in the org
ℹ️ Salesforce Enhanced (Lightning) Notes can be attached to multiple Salesforce objects. However, in Vitally, a Note can only be attached to a single object. When importing a Salesforce Enhanced Note, Vitally will attach it to the first related object that also exists in Vitally.
How-To | How-To Visual |
This process is mostly the same for Notes and Tasks:
|   
|
When an Account or Organization moves from "ignored" to "subscribed", we will backfill historical data based on the period of time it was ignored.
Mapping Task fields to Vitally fields
Default mappings:
Salesforce (Task Field) | Vitally (Task Field) |
Subject | Task name |
Description | Task description |
IsClosed | Task due date (IsClosed will be set to |
Owner | Task assignee |
Custom mapping:
Salesforce (Task Field Type) | Vitally (Task Field Type) |
Text | String |
Picklist | String |
Picklist (Multi-Select) | Multi-select |
Checkbox | Boolean |
Task fields in Vitally and Salesforce sync bi-directionally within an hour of any updates. Whether a Task is created in Vitally or Salesforce, any fields added—either during Task creation or afterward—will be included in the sync.
Salesforce FAQ: Notes & Tasks
Pushing Vitally Notes to Salesforce
Pushing Vitally Notes to Salesforce
Once I enable the push to Salesforce, are past notes already in Vitally created in Salesforce?
No, if you'd like to have your existing Vitally notes pushed to Salesforce, please contact our support team.
Is there a delay when creating/updating a Vitally note before the change is pushed to Salesforce?
There may be a slight delay, but the update will be applied to Salesforce in near real-time.
What happens if I take a note on an account in Vitally not linked to a Salesforce object?
Nothing - no note will be created in Salesforce.
Can I push Vitally notes to Salesforce as tasks instead?
Not at the moment, but if this is essential for your Salesforce integration, please let us know your feedback!
Does Vitally modify the note in any way when pushed to Salesforce?
Yes - we clean the note of all rich text formatting when creating the Salesforce note. This occurs because Vitally's notes support HTML, while Salesforce's default note field does not.
How are owners set in the Salesforce note?
Vitally will attempt to set the note owner to a Salesforce user with the same email as the user that created the note in Vitally. If a user is not found with a matching email, the API user is then set as the note owner.
What happens when a note that was pushed to Salesforce is deleted in Vitally?
If the note was first created in Vitally (i.e. it is not a 'clone' of a Salesforce-owned note), then Vitally will delete the note in Salesforce. If the note was first created in Salesforce and the Vitally 'clone' is deleted in Vitally, it is not deleted in Salesforce.
What happens when a note pushed to Salesforce is deleted in Salesforce?
Nothing - the note in Vitally will remain.
Some of the note formatting didn't properly sync to Salesforce (Salesforce Lightning)
Currently Bold, Italic, and Underline are the only formatting supported to write back from Vitally to Salesforce. So for example, if you're using bullets to make a list that won't sync over to Salesforce.
Will updates made to Vitally-created Notes in Salesforce sync back to Vitally?
We only import note bodies for Salesforce-created notes. If a note is created in Vitally and updated in Salesforce, we will sync other attributes but not the note body as it is incompatible with our rich text editor.
I edited a note in Vitally, why isn't that change syncing back to Salesforce?
Notes edited in Vitally will not sync changes back from Salesforce. The reason for that is that in Vitally, you can format the note and embed things in it, like tasks and traits, and we don't send a representation of that to Salesforce in a way that preserves the embedded information. That means that if we allowed changes from Vitally to sync to Salesforce, it could wipe out those parts of the note and result in data loss.
Importing Salesforce Notes to Vitally
Importing Salesforce Notes to Vitally
Once I enable the import from Salesforce, are past notes already in Salesforce created in Vitally?
We import Salesforce notes created or updated in the last 12 months. If you'd like to have more historical Salesforce notes imported into Vitally, please contact our support team.
Is there a delay when creating/updating a Salesforce note before the change is pushed to Vitally?
Yes - there is a maximum of a 1 hour delay.
How are owners set on the Vitally note?
Vitally will attempt to set the note owner to a Vitally user with the same email as the user that owns the note in Salesforce. If a user is not found with a matching email, Vitally will auto-create a new Vitally user and associate the note to the newly auto-created profile. Note that auto-created users do not count against teammate limits on your Vitally plan.
What happens if the Salesforce note doesn't have an owner in SFDC?
Salesforce automatically sets the creator of the note as the owner if one is not specified.
What happens when a note that was imported from Salesforce is deleted in Vitally?
If a Salesforce-imported note is later deleted in Vitally, then Vitally will not delete the note in Salesforce. This way, you can selectively clean up notes imported from Salesforce without affecting your Salesforce data.
Pushing Vitally Tasks to Salesforce
Pushing Vitally Tasks to Salesforce
Once I enable the push to Salesforce, are past tasks in Vitally created in Salesforce?
No, if you'd like your existing Vitally tasks to be pushed to Salesforce, please contact our support team.
Is there a delay when creating/updating a Vitally task before the change is pushed to Salesforce?
There may be a slight delay, but the update will be applied to Salesforce in near real-time.
What type of task is created in Salesforce?
A Salesforce task with a subtype of task
What happens if I create a task on an account in Vitally not linked to a Salesforce object?
Nothing - no task will be created in Salesforce.
Does Vitally modify the task in any way when pushed to Salesforce?
Yes - we clean the task of all rich text formatting when creating the Salesforce task. This occurs because Vitally tasks support HTML, while Salesforce tasks do not.
How are owners set in the Salesforce task?
Vitally will attempt to set the task owner to a Salesforce user with the same email as the user who assigned, completed, or created the task in Vitally (in that order). If a user is not found with a matching email, the API user is then set as the task owner.
What status does Vitally set on the task?
If the task is completed in Vitally, we'll set the Salesforce task's status field to your first task status that is defined as a closed status. If it is not completed, then your default task status will be used.
What happens when a task created in Vitally and pushed to Salesforce is deleted in Vitally?
If the task was created in Vitally (i.e. it is not a 'clone' of a Salesforce-owned task), then Vitally will delete the task in Salesforce. If the task was first created in Salesforce and the Vitally 'clone' is deleted in Vitally, it is not deleted in Salesforce.
What happens when a task pushed to Salesforce is deleted in Salesforce?
Nothing - the task in Vitally will remain.
Why is my task status not syncing to Vitally?
Salesforce task statuses do not automatically map to Vitally task statuses. Make sure to update the task status names in Vitally Settings -> Tasks -> Statuses to match Salesforce status names. For example, Vitally's default status is 'Not Started', but in Salesforce, it is 'Open.' Once you update the status names in Vitally to match what you have in Salesforce, they will sync.
Importing Salesforce Tasks to Vitally
Importing Salesforce Tasks to Vitally
Once I enable the import from Salesforce, are past tasks already in Salesforce created in Vitally?
Vitally imports Salesforce tasks created or updated in the last 12 months. If you'd like to have more historical Salesforce tasks imported into Vitally, please contact our Support team.
Is there a delay when creating/updating a Salesforce task before the change is pushed to Vitally?
Yes - there is a maximum of a 1 hour delay.
What types of Salesforce tasks are supported?
Salesforce tasks with a subtype of Task or Call are imported into Vitally. Email tasks are not currently synced.
How are owners set on the Vitally task?
Vitally will attempt to set the task assignee to a Vitally user with the same email as the user that owns the task in Salesforce. If a user is not found with a matching email, Vitally will auto-create a new Vitally user and associate the task to the newly auto-created profile. Note that auto-created users do not count against teammate limits on your Vitally plan.
What happens when a task that was imported from Salesforce is deleted in Vitally?
If a Salesforce-imported task is later deleted in Vitally, then Vitally will not delete the task in Salesforce. This way, you can selectively clean up tasks imported from Salesforce without affecting your Salesforce data.
Why is my task status not syncing to Vitally?
Salesforce task statuses do not automatically map to Vitally task statuses. Make sure to update the task status names in Vitally Settings -> Tasks -> Statuses to match Salesforce status names. For example, Vitally's default status is 'Not Started', but in Salesforce, it is 'Open.' Once you update the status names in Vitally to match what you have in Salesforce, they will sync.
Syncing Custom Objects from Salesforce
Sync any Salesforce object associated with your mapped Account and/or Organization object into Vitally. This includes standard objects like Opportunities and Cases, and also any custom objects you create in Salesforce.
ℹ️ On the initial sync, Vitally will import all Custom Objects created or updated in the last 12 months.
How-To | How-To Visuals |
|  |

⚠️ If you turn off the Salesforce Sync (e.g., you are moving to another platform and therefore no longer need to integrate with Salesforce), all properties, with the exception of Custom Objects, will remain in your Vitally account. Traits will become stale and we will archive Custom Objects.
Mapping Custom Object Traits to the Account
There may be instances where you want to map data from your Custom Objects to the Account level in Salesforce so you can utilize this in Vitally, such as Lifecycle Tracking, Notes, Docs, etc.
As an example, if you track revenue at the Opportunity level you may want to sync the Opportunity "Amount" from the last closed Opportunity into Vitally as that Account's MRR. If you have a list of Custom Objects like this associated with an Account and want to use specific fields from one of those objects in Vitally at the Account level, you can do so by following these instructions. You will need admin access in Salesforce to configure this. Expand the below to follow a step-by-step:
Using Custom Object fields (e.g. Opportunity amount, close date, etc) at the Account level
Using Custom Object fields (e.g. Opportunity amount, close date, etc) at the Account level
Create a Lookup Relationship field in Salesforce on your Account
In Salesforce's Object Manager, find the Account object (or whichever object you've mapped to Vitally Accounts). Go to that object's Fields & Relationships and create a new field. For Data Type, select Lookup Relationship.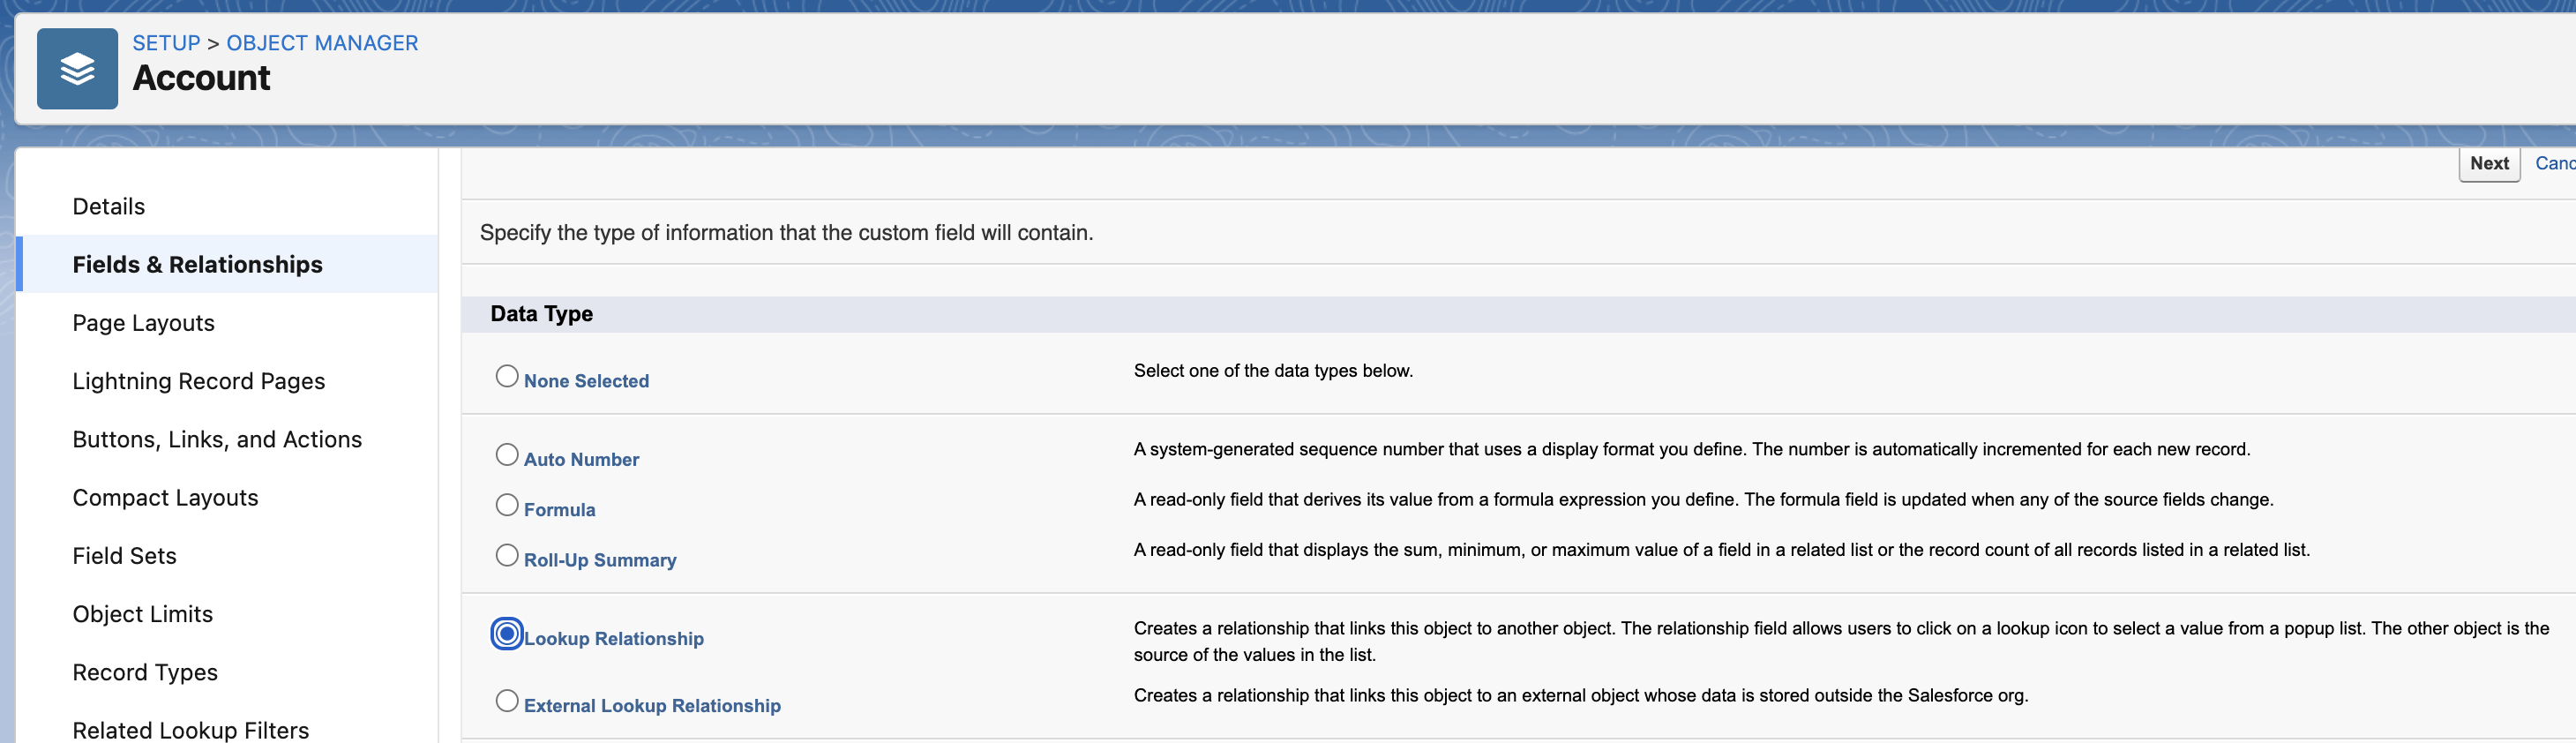
Hit Next and relate the field to the Opportunity object (or whichever custom object has the field you're wanting to leverage in Vitally).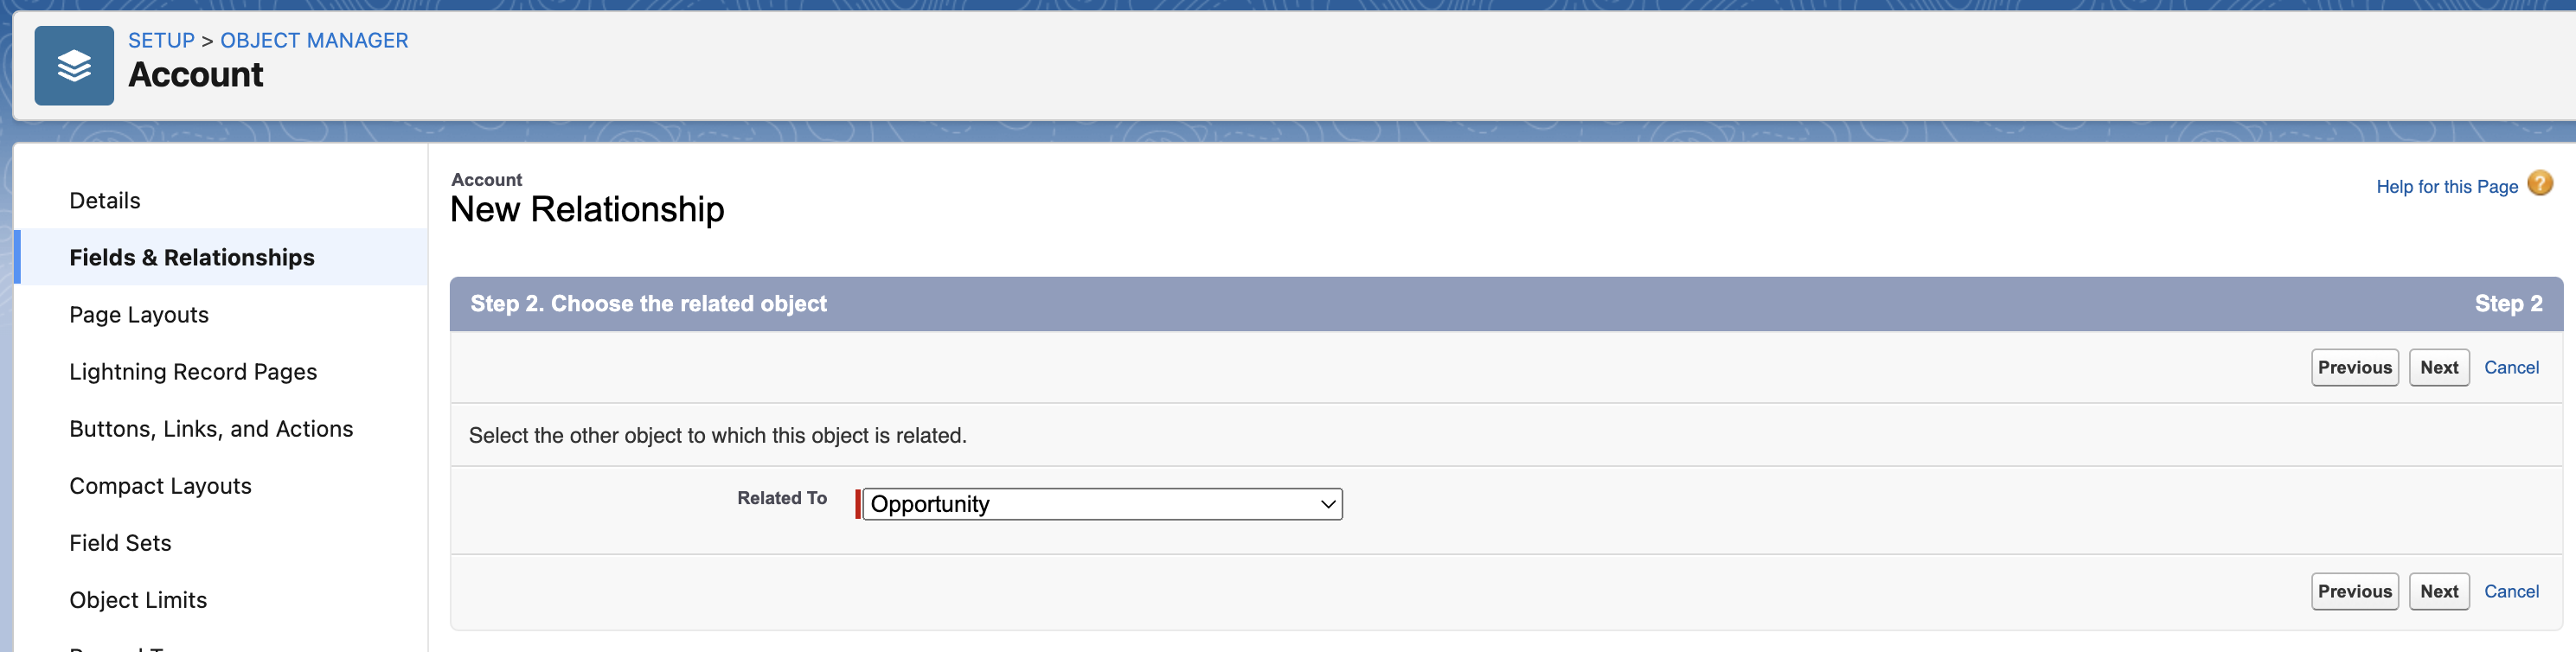
Name your field something appropriate (e.g. Most Recent Opportunity) and work through the rest of the form to create your field.
Create a Flow to update the Lookup Relationship field
Now that you have a field on your Accounts ready to reference your most recent Opportunity, we now need to set that field. To do so automatically in Salesforce, you can use a Flow (or a Process if you aren't yet on Flows).
First, create a new Record-Triggered Flow: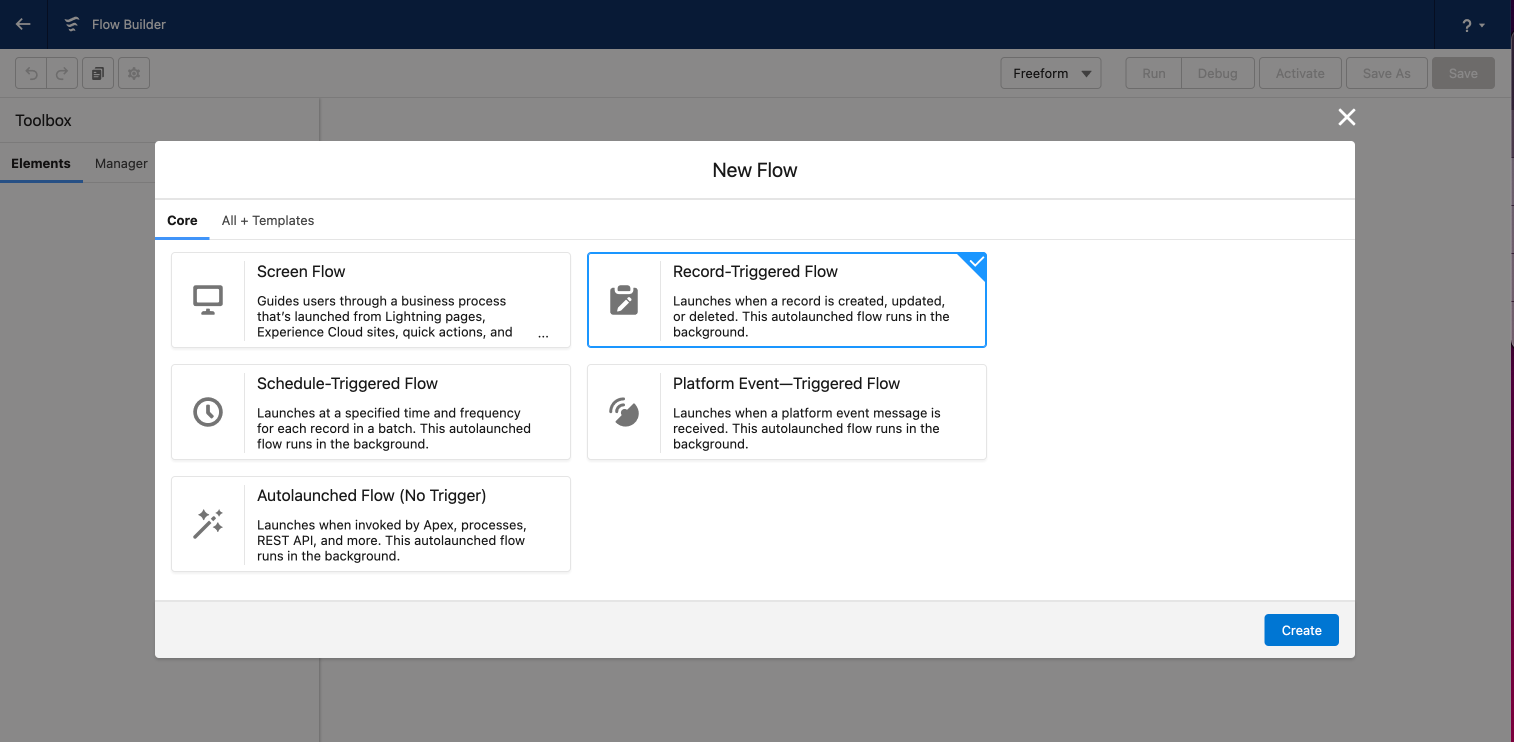
Trigger the flow anytime an Opportunity (or whichever custom object has the field you're wanting to leverage in Vitally) is created or updated: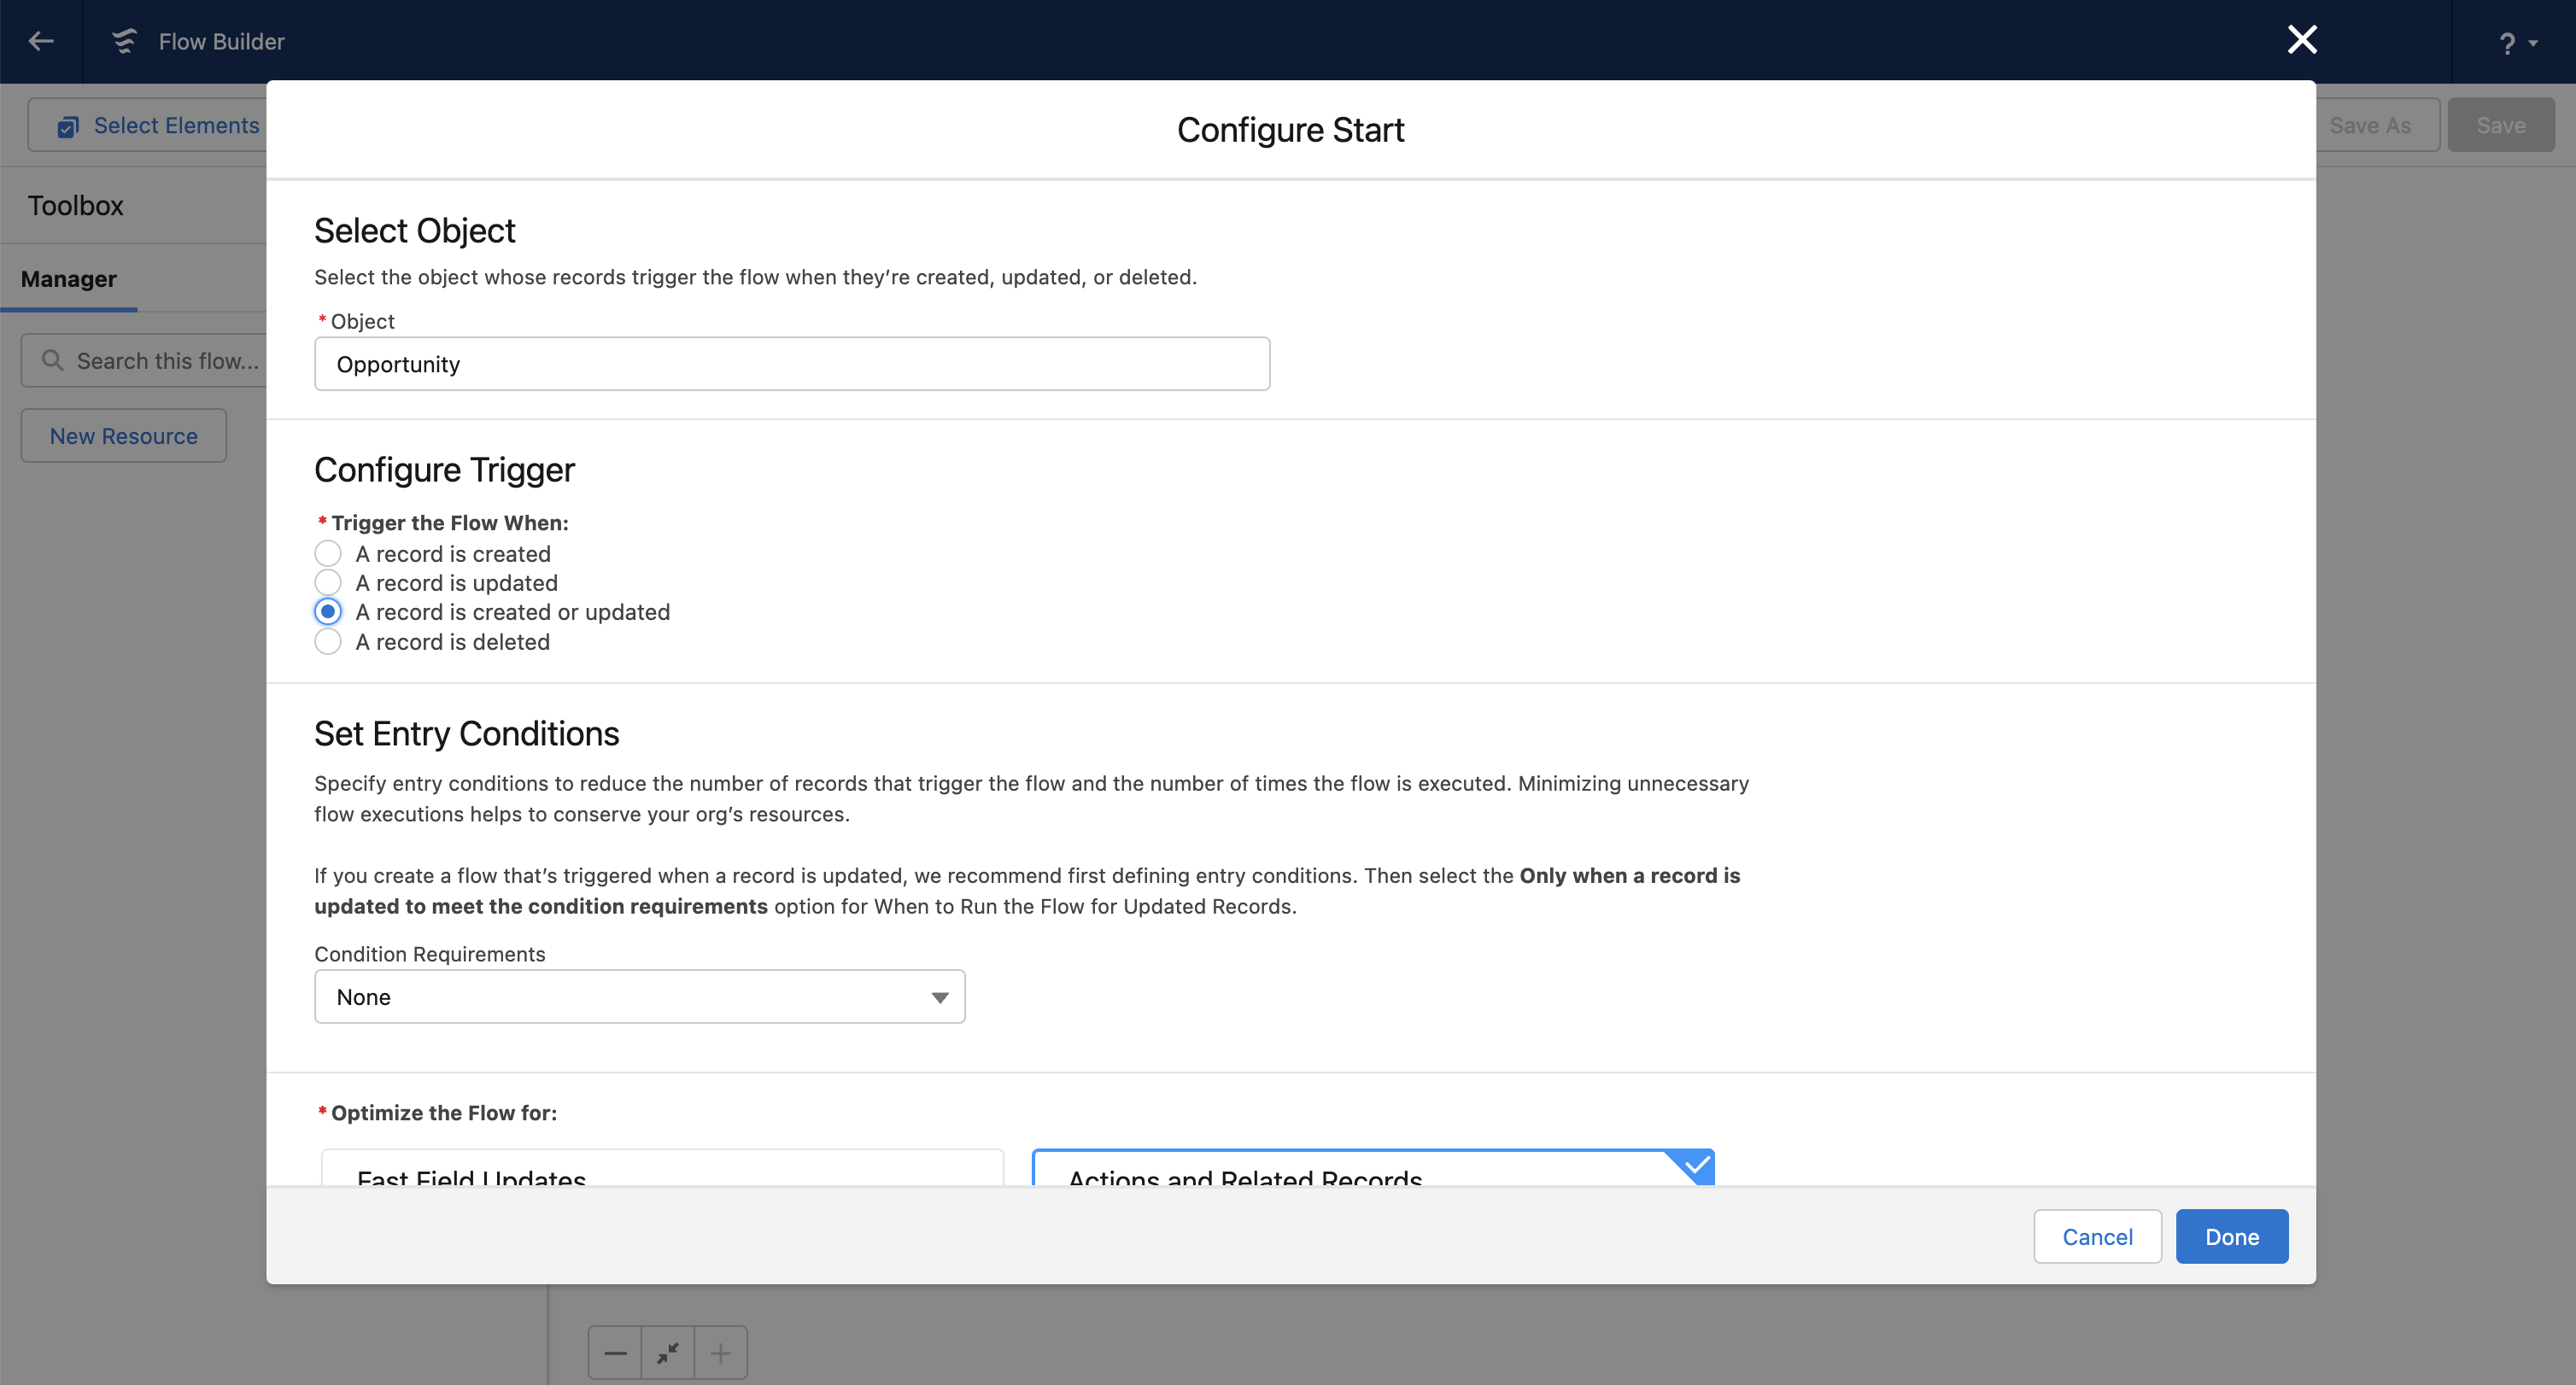
Since in this example, we are only wanting to track the most recent Closed Won Opportunity, we can also add Entry Conditions to ensure this Flow only runs on Opportunities when the Stage is set to Closed Won. We'll also set the option to run the flow every time a record is updated and meets the condition requirements: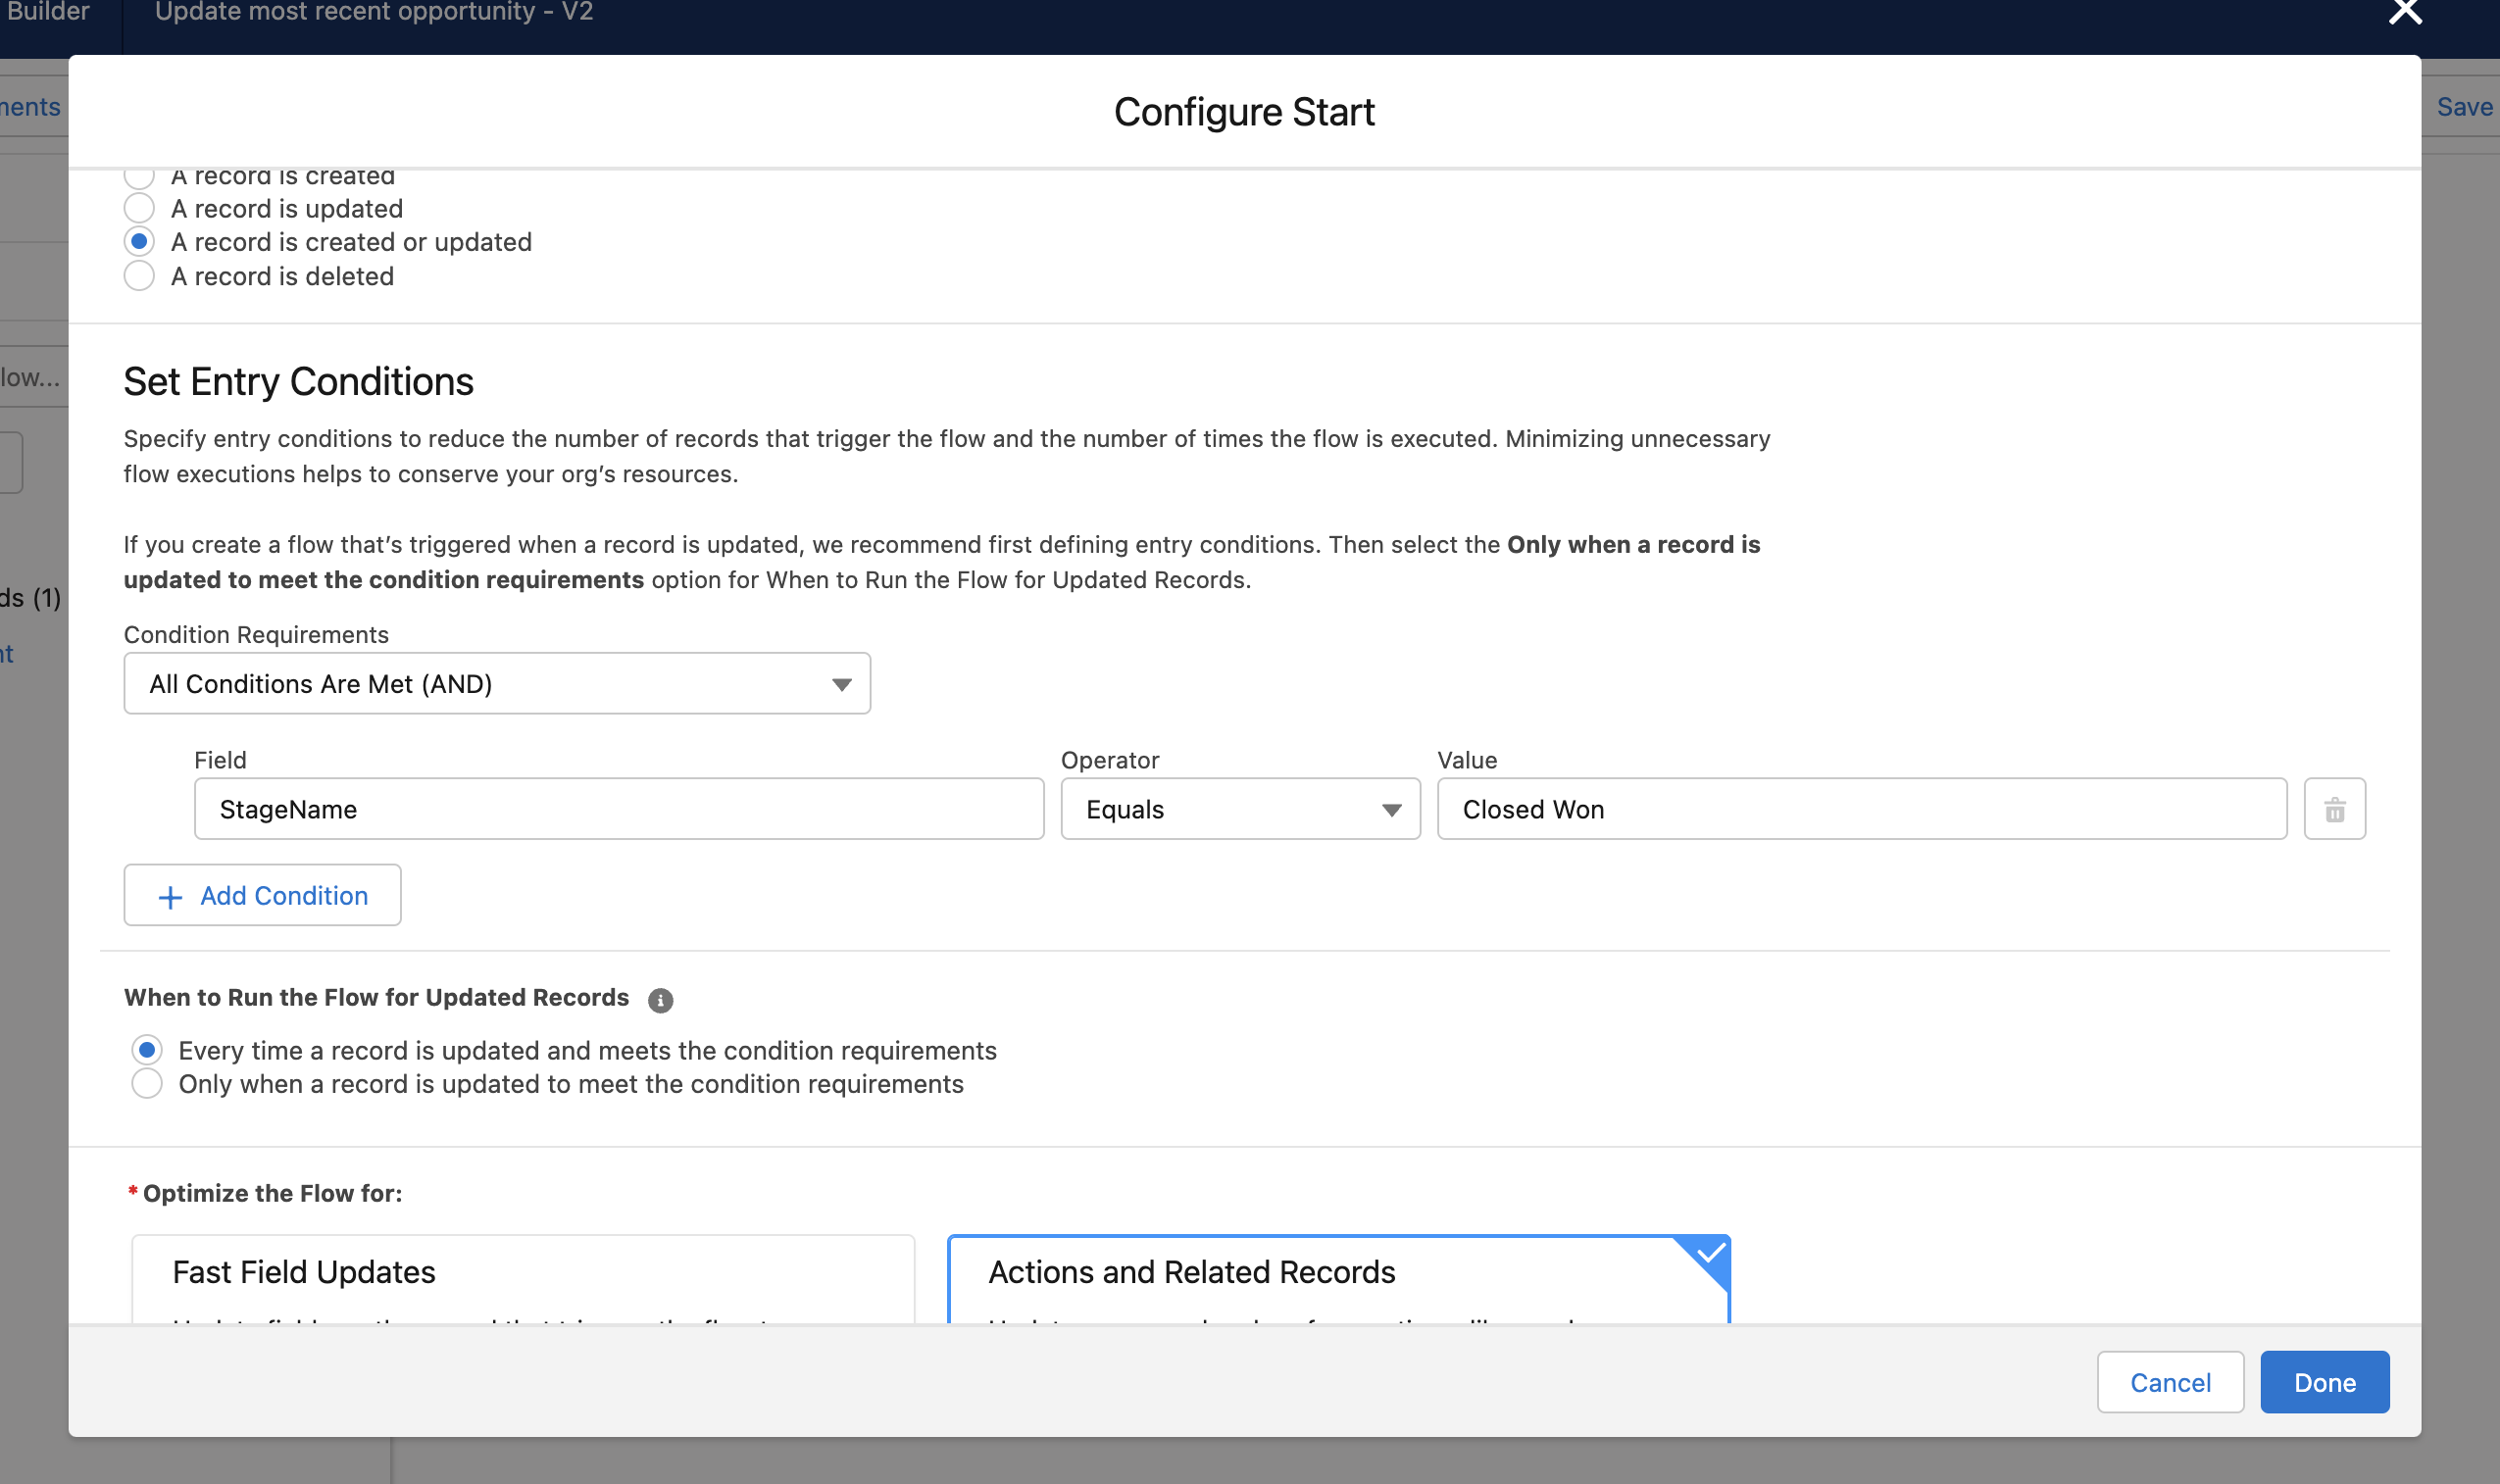
For Optimize the Flow for, select Actions and Related Records. Then, hit Done.
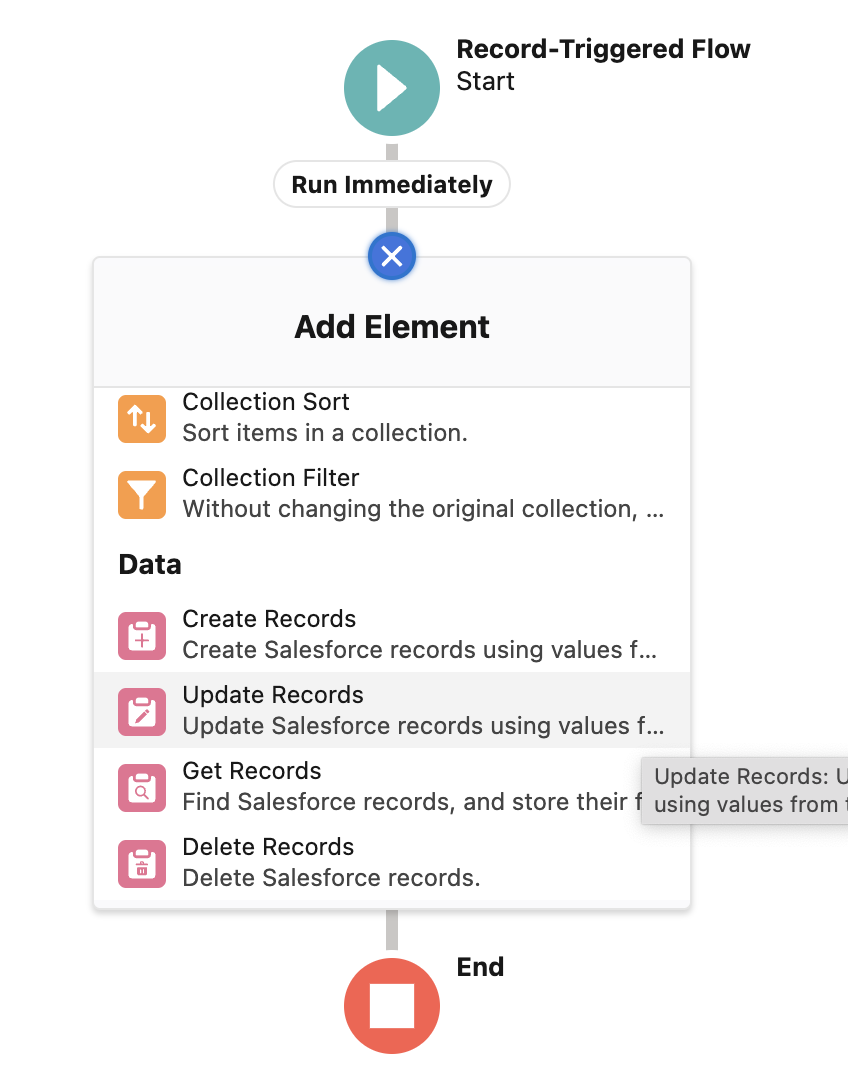
In the Flow, hit the + button to add a new element to the Flow.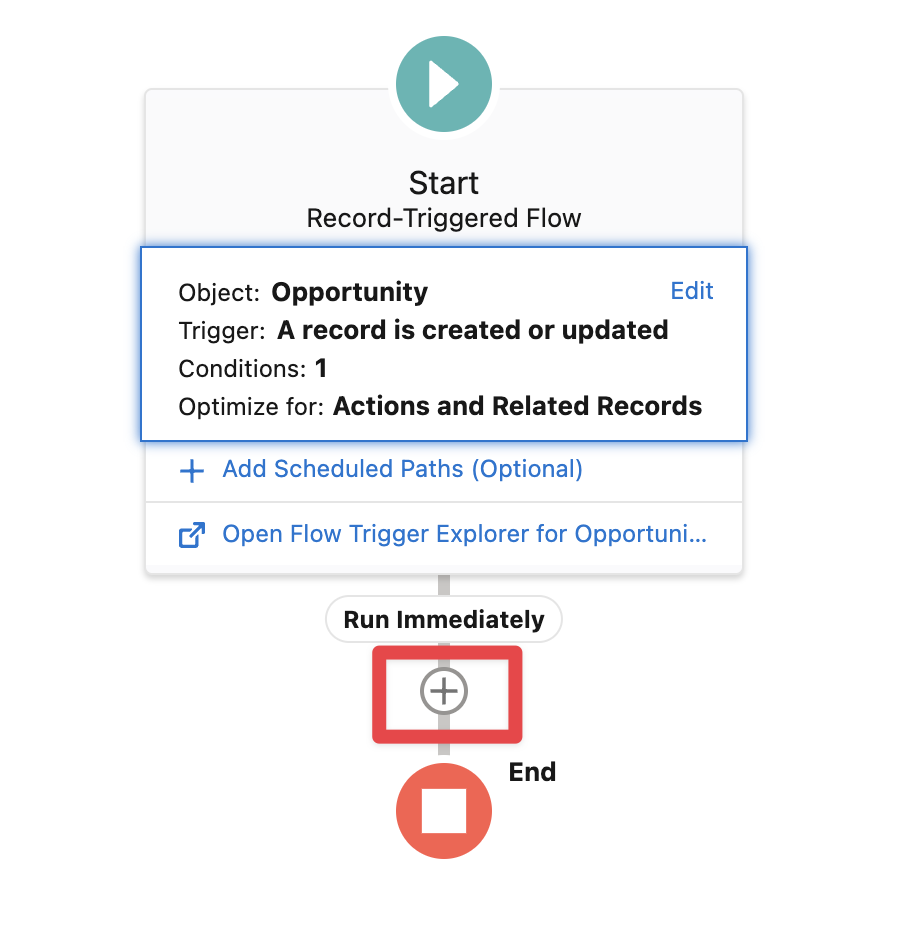
Scroll down in the options and select Update Records:
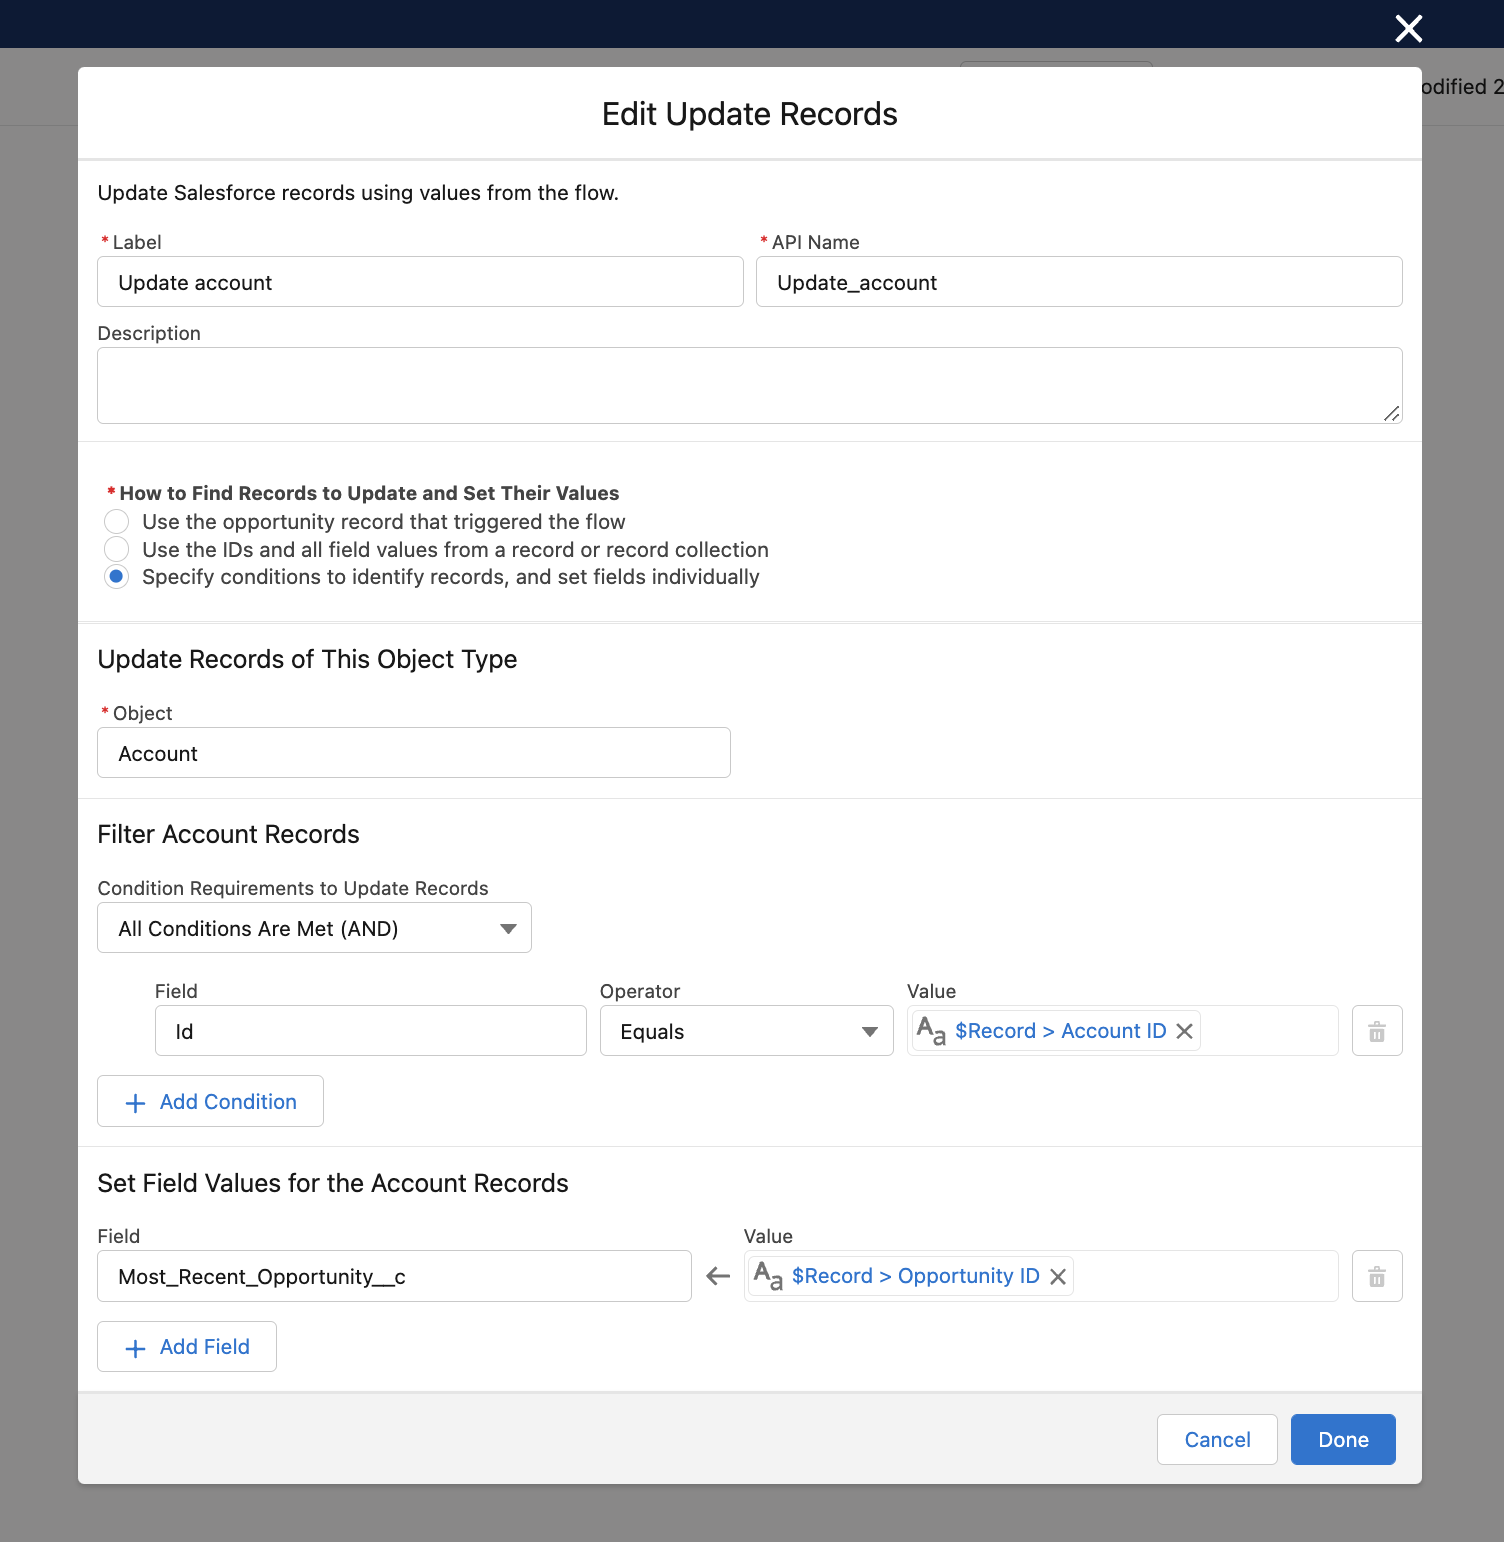
Configure your Element to mimic the below. The below simply looks for the Salesforce Account that owns the Opportunity going through the Flow and updates the Most Recent Opportunity field created in Step 1 above.
(Optional) - Trigger an update on all your Salesforce Opportunities
With the above steps, moving forward, anytime an Opportunity is created or updated, the Flow will run and update the Most Recent Opportunity Account field. Now, you may want to set the field for all you current Accounts. To do that, given the above Flow configuration, you simply need to trigger an update on all Opportunities. There's a few ways to do this in Salesforce, which they detail here. Another option not listed in that article is to create another Flow to update all Opportunities. Whichever route you choose is up to you!
Update your Salesforce configuration in Vitally to pull in fields from the Most Recent Opportunity object
Now that you have a field on your Accounts in Salesforce that tracks the most recent Closed Won Opportunity, you can now pull fields from that Opportunity into Vitally and attach them to your Vitally Accounts!
To do so, simply head over to your Salesforce Integration page in Vitally.
Scroll down to the option where you map the Salesforce fields to be synced into Vitally. Select the newly-defined Most Recent Opportunity object in the left column and any fields you want to pull in from that object in the second column:
That's it! You'll now see the newly-mapped Opportunity fields on your Vitally accounts 🎉
Syncing Key Roles from Salesforce
Vitally allows you to map traits from Salesforce to key roles, providing a seamless way to keep your contact information updated.
A key role can only be mapped to an internal user, not an end user. Note that an Account Owner is the exception, learn more here.
How-To | How-To Visuals |
|  
|
Keep in mind that if you use a custom text trait to map a key role (instead of a Salesforce reference trait), the sync between the custom trait and the key role is not bidirectional. This means:
Updating the key role in the Key Roles Card will not update the value of the mapped custom trait.
For example, if you change the key role directly within Vitally, that change will not reflect back on the custom trait.
To ensure consistency between the custom trait and the key role, we recommend updating the mapped custom trait directly rather than making changes to the key role.
⚠️ If you don't set a sync mode in your Key Role settings, Vitally will default to a one-way sync from SFDC to Vitally only.
Manually Trigger a Re-sync of Organization, Account, or User Salesforce Trait Data
ℹ️ Manually triggering a re-sync is only available if you're using our Customer 360 navigation.
If you ever notice outdated trait data in Vitally or Salesforce, a quick click can refresh it. You can manually trigger a re-sync of Organization, Account, or User trait data for your Salesforce integration.
Manually pull or push updated data from Salesforce
Push updates on demand instead of waiting up to an hour or contacting Support
How-To | How-To Visuals |
| 
|
Salesforce Errors
To ensure your data is syncing correctly, you'll see an error when there is an issue with your integration or a specific account. Remedying these errors is important to ensure your data consistently syncs to and from Vitally.
We will display the errors that Salesforce sends Vitally and display those exactly as they're being sent.
Common Errors
Common Errors
Salesforce Error Code:
INVALID_OR_NULL_FOR_RESTRICTED_PICKLIST. When you enter a value into a field in Vitally that is subsequently mapped to a field in Salesforce, this situation arises if the latter cannot accept the provided value.Salesforce Error Code:
INVALID_FIELD. This situation occurs when we send a query to Salesforce in an attempt to retrieve data from a Salesforce field that no longer exists (e.g. Salesforce field gets deleted after being mapped in our integration).
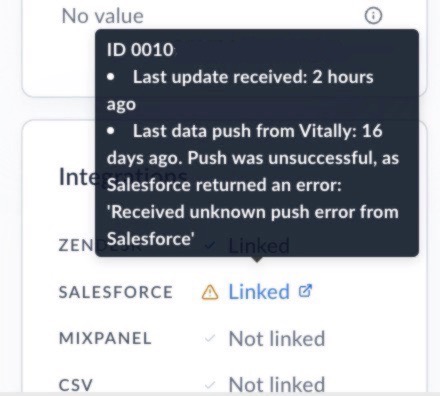
Checking the integrations card is one of the best ways to get insight into errors. You can hover over each of the established links to see vital information about the last update between Salesforce and Vitally. For example, an error can look like "Push was unsuccessful as Salesforce returned an error: 'Received unknown push error from Salesforce':
Reconnect Salesforce Integration
If you need to update the user who authenticated the Vitally <> Salesforce integration, you can do so without impacting your existing configuration.
The integration may also become automatically disconnected if the authenticated user’s credentials change or become unauthorized. When this happens, the admin who connected the integration will receive an email notification, and you’ll be prompted to reconnect on the Salesforce integration page in Vitally.
All mapped fields, import filters, and other integration specifics will be retained when reconnecting. Remember, the Salesforce user you connect with has to have the following enabled within their Permission Sets:
Read, Create, and Edit Object Permissions enabled for the Salesforce objects you wish to connect
Read, Create, and Edit Object Permissions enabled for the Push Topic object, which is used by Vitally to subscribe to Salesforce changes in near real time
View Setup and Configuration System Permission enabled
How-To | How-To Visual |
|  |
Salesforce FAQ
If I delete data in Salesforce, will it also be deleted in Vitally?
We will auto-clean up Vitally records based on data deletions in Salesforce. That is, if an object in Salesforce is deleted, it triggers some cleanup of the linked record in Vitally. What that cleanup is depends on the Vitally record:
For Accounts, Organizations, and Users - the link to the Salesforce record is removed, and any Salesforce traits are wiped out. However, the record will remain in Vitally and will not be auto-archived since Vitally can have a lot of data underneath these records (like notes, projects, etc). If you want these records to be auto-removed in Vitally when the linked Salesforce record is deleted in Salesforce, you can use track rules to ignore them.
For Custom Objects - the linked Vitally record is archived in Vitally and will no longer display in views or search results
If I delete data in Vitally, will it also be deleted in Salesforce?
Only some data is deleted in Salesforce depending on the record:
For Notes and Tasks - if they originated in Vitally, they will be deleted from Salesforce.
For Custom Objects - if they originated in Salesforce, the record won't be deleted from Salesforce. However, it will be permanently deleted from Vitally and will not re-sync, even if the record remains in Salesforce.
Is it possible to sync Conversations from Vitally to Salesforce and vice versa?
No, conversations are not included in our Salesforce integration. The best suggestion to track conversations sent from Vitally in Salesforce would be to have team members add their 'BCC to Salesforce' email address within My Profile -> Email & Calendar Settings -> Google or Outlook.
How can I use traits from a Custom Object in Vitally features like Lifecycle Tracking, Notes, Docs, etc?
To view traits from a custom object such as Opportunities in Salesforce at the Account level, you will need to create a lookup relationship mapping and a workflow to trigger this as per the instructions here.
Why are my Key Roles not syncing from Salesforce to Vitally?
The Key Role sync relies on using a mapped Salesforce Reference trait that contains the email of a user record in Salesforce. For us to sync the Key Role to Vitally, the assignee must have a user record in Salesforce and a seat in Vitally (it can be an Observer, Team Member, Leader, or Admin seat).
Should I use a Fallback ID?
This is optional but useful if there is a delay in the "External ID" being set on your Accounts. For example, say you sign a new contract with a customer but don't provision their product instance for a few weeks. If your "External ID" is the primary ID of the Account in your database, you won't have that ID until their instance is provisioned, meaning they won't show in Vitally until that occurs. To resolve this, you can specify a 'fallback ID' here (for example, Salesforce's record ID). The Vitally platform will then create Accounts using this fallback ID if the primary external ID is not set. Once the primary external ID is set on the Account, Vitally will automatically switch the ID over to the primary and merge any duplicate Accounts created from other systems.
Where can I see all Salesforce tasks?
Many Salesforce tasks aren't actual tasks that should be done at some future date. Given that, since many Salesforce tasks are 'completed' by default, you may wonder where they show in Vitally. Whenever viewing a task list in Vitally, be sure to turn on completed tasks if you'd like to view your Salesforce-completed call tasks.
Why is my calculated Salesforce field not syncing into Vitally when it updates?
This is a Salesforce limitation. calculated and calculatedFormula properties in Salesforce don't modify the record and, therefore, the timestamp. This is what triggers us to update the data in Vitally when we scan for updates. When there is another update to the record, at that point we'll update that data point and the calculated field.
Can I change the user who authenticated the Salesforce integration?
Yes! Follow the steps outlined above in Reconnect Integration
Why don't I see all of my fields in the field drop-down when configuring Salesforce?
It is likely that the fields are not accessible by the authenticated Salesforce profile. To resolve this, please navigate to the object & field within Salesforce Object Manager, click View Field Accessibility, and ensure the profile has read-only or edit permissions, depending on what you need.
Can Users created manually in Vitally be synced and created in Salesforce?
Yes, there is an option within the User tab of the Salesforce Integration page that allows you to set the option to Yes - any users manually created in Vitally should create new Contact records in Salesforce. We will automatically check Salesforce Contacts based on the email you provide in Vitally to prevent duplicate profiles from being created in Salesforce.
My User is associated with multiple Accounts in Salesforce. Will those associations sync to Vitally?
No. Vitally will only sync the User's direct Account association. If the User's direct Account association is updated in Salesforce, we will establish the new Account association in Vitally and will not remove any of the User's existing Account associations.
What happens when I turn off the Salesforce integration?
Trait data becomes stale in Vitally, but traits will not be deleted. They will still appear in Table Views, Account 360s, etc. Custom Objects are archived, but not permanently deleted! They will not appear in Table Views or Account 360s. If you decide to re-enable the Salesforce integration in the future and sync the same Custom Objects, all the records will reappear in Vitally.
Why can't I update the values of a multi select in Vitally?
If you edit a Salesforce trait, you'll see an error that says, "This trait's options are managed by the Salesforce integration. Removing or adding options from Vitally is not supported." Enumerated Salesforce multi select fields and reference fields are all managed by their respective integration (Salesforce) so you'll need to make edits to the values in Salesforce.